原生JS拖拽效果
浏览: 4,256次 日期:2018年07月22日 16:25:01 作者:青格勒
很多时候我们做网站都会遇到JS拖拽的需求,今天就按照一个弹出框拖拽作为一个小案例写个JS原生的代码。
按照上面的需求咱们开始制作一个拖拽效果吧。
第一步、咱们得写一个布局和响应的css
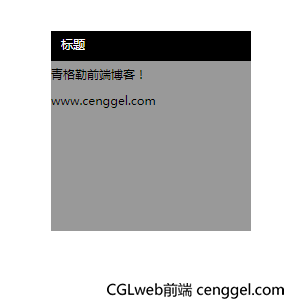
<div id="box">
    <div id="btn">标题</div>
    <p>青格勒前端博客!</p>
    <p>www.cenggel.com</p>
</div>
<style>
#box{ height:200px; width:200px; background:#999; position:absolute;}
#btn{ height:30px; background:#000; cursor:all-scroll; padding:0 10px; color:#fff;}
</style>这里的话咱们id=btn的为拖拽的区域。
二、逻辑讲述
整个JS代码不是很多,当鼠标按下的时候获取鼠标的位置和id=box的上距和左边距,然后计算目前的位置。
然后这时候鼠标移动的时候再次计算鼠标的位置,然后给id=box位置
当鼠标按钮松开的时候把onmousemove和onmouseup清除掉
三、JS代码部分
<script type="text/javascript">
    function drag(obtnf,obtn){
        //按钮及初始值
        var obtn = document.getElementById(obtn),
            obtnf = document.getElementById(obtnf),
            disX = 0,
            disY = 0;

        //鼠标按下时开始计算
        obtn.onmousedown = function(ev){
            var ev = ev || window.event;
            disX = ev.clientX - obtnf.offsetLeft;
            disY = ev.clientY - obtnf.offsetTop;

            //鼠标按下并移动时计算
            document.onmousemove = function(ev){
                var ev = ev || window.event;
                obtnf.style.left = ev.clientX - disX + 'px';
                obtnf.style.top = ev.clientY - disY + 'px';
            };

            //鼠标松开时清除时间
            document.onmouseup = function(){
                document.onmousemove = null;
                document.onmouseup = null;
            };
            return false;
        };
    };
    //引用
    drag("box","btn")
</script>
最后咱们的效果如下
做到这里其实咱们的效果并不完美,应为当我们拖拽的时候发现,他能直接被拖到浏览器的外面去了,所以咱们再给他加点限制。
最终JS代码如下:
<script type="text/javascript">
    function xianzhi(val,max,min){
        if (val > max){
            return max;
        }else if(val < min){
            return  min;
        }else{
            return val;
        }
        console.log(val)
    }
    function drag(obtnf,obtn){
        //按钮及初始值
        var obtn = document.getElementById(obtn),
            obtnf = document.getElementById(obtnf),
            disX = 0,
            disY = 0;

        //鼠标按下时开始计算
        obtn.onmousedown = function(ev){
            var ev = ev || window.event;
            disX = ev.clientX - obtnf.offsetLeft;
            disY = ev.clientY - obtnf.offsetTop;

            //鼠标按下并移动时计算
            document.onmousemove = function(ev){
                var ev = ev || window.event;
                var lefts= (ev.clientX - disX),
                    tops= (ev.clientY - disY),
                    maxle= (document.documentElement.clientWidth - obtnf.offsetWidth),
                    maxto= (document.documentElement.clientHeight - obtnf.offsetHeight)

                lefts = xianzhi(lefts,maxle,0)
                tops = xianzhi(tops,maxto,0)

                obtnf.style.left = lefts + 'px';
                obtnf.style.top = tops + 'px';
            };

            //鼠标松开时清除时间
            document.onmouseup = function(){
                document.onmousemove = null;
                document.onmouseup = null;
            };
            return false;
        };
    };
    //引用
    drag("box","btn")
做到这里一个小型的拖拽效果就出来了。
文章链接:http://cenggel.com/js/137.html
版权声明:文章《原生JS拖拽效果》由青格勒编写,转载请带上文章链接。
本章内容纯属乱讲,如有雷同,纯属巧合。如有借鉴之处已表明出处。
点击任意位置关闭窗口,感谢您的支持。
打赏规则 - 为了避免对于打赏模式产生误解,说明一下几点内容:
- 1.打赏纯粹自愿,金额不限,别太多,1块就行;
- 2.打赏不能作为解答疑问的理由;
- 3.打赏不能帮你做毕业设计或论文;
- 4.打赏不能帮你做工作中的项目;
- 5.打赏就是这不能那不能,只是单纯打赏而已。
- 5.最后谢谢支持。
相关文章
-
2022-12-11
◆ 怎么用js生成雪花id?
-
2020-02-15
◆ js计算一筐鸡蛋
-
2019-02-27
◆ JS生成随机密码
-
2019-01-20
◆ JQuery拖拽效果
-
2018-12-25
◆ 后端传过来一个JS代码,前端拿到之后执行
-
2018-11-18
◆ JS数组去重 – JSON数组去重
发表评论